Overview
Rotating Datacenter Proxies give you access to high-speed datacenter IPs for browsing, automation, and data collection. They are billed pay-as-you-go by traffic (per GB), and you configure targeting, protocol, and session type from the Geonode dashboard.
The dashboard experience is similar to Residential Proxies. The main difference is that traffic uses datacenter IPs instead of residential IPs.
How Rotating Datacenter Proxies Work
Rotating Datacenter Proxies use a traffic-based plan model:
- Usage is billed per GB.
- Your remaining bandwidth is shown in GB in the dashboard.
- Traffic is consumed as you send requests through the proxy.
- Pricing starts from the rate shown on your Rotating Datacenter Proxies plan.
- You can configure endpoints, targeting, and session type before connecting.
- You can top up bandwidth manually or enable auto top-up from the dashboard.
See Pricing for Pay As You Go and Subscription plans.
Access Your Credentials
- Log in to the Geonode Dashboard.
- Go to Proxies → Rotating Datacenter Proxies.
- Open Proxy configuration.
- Find your proxy credentials.
Your credentials include:
- Username
- Password
- Host
- Port
Configure Your Proxy
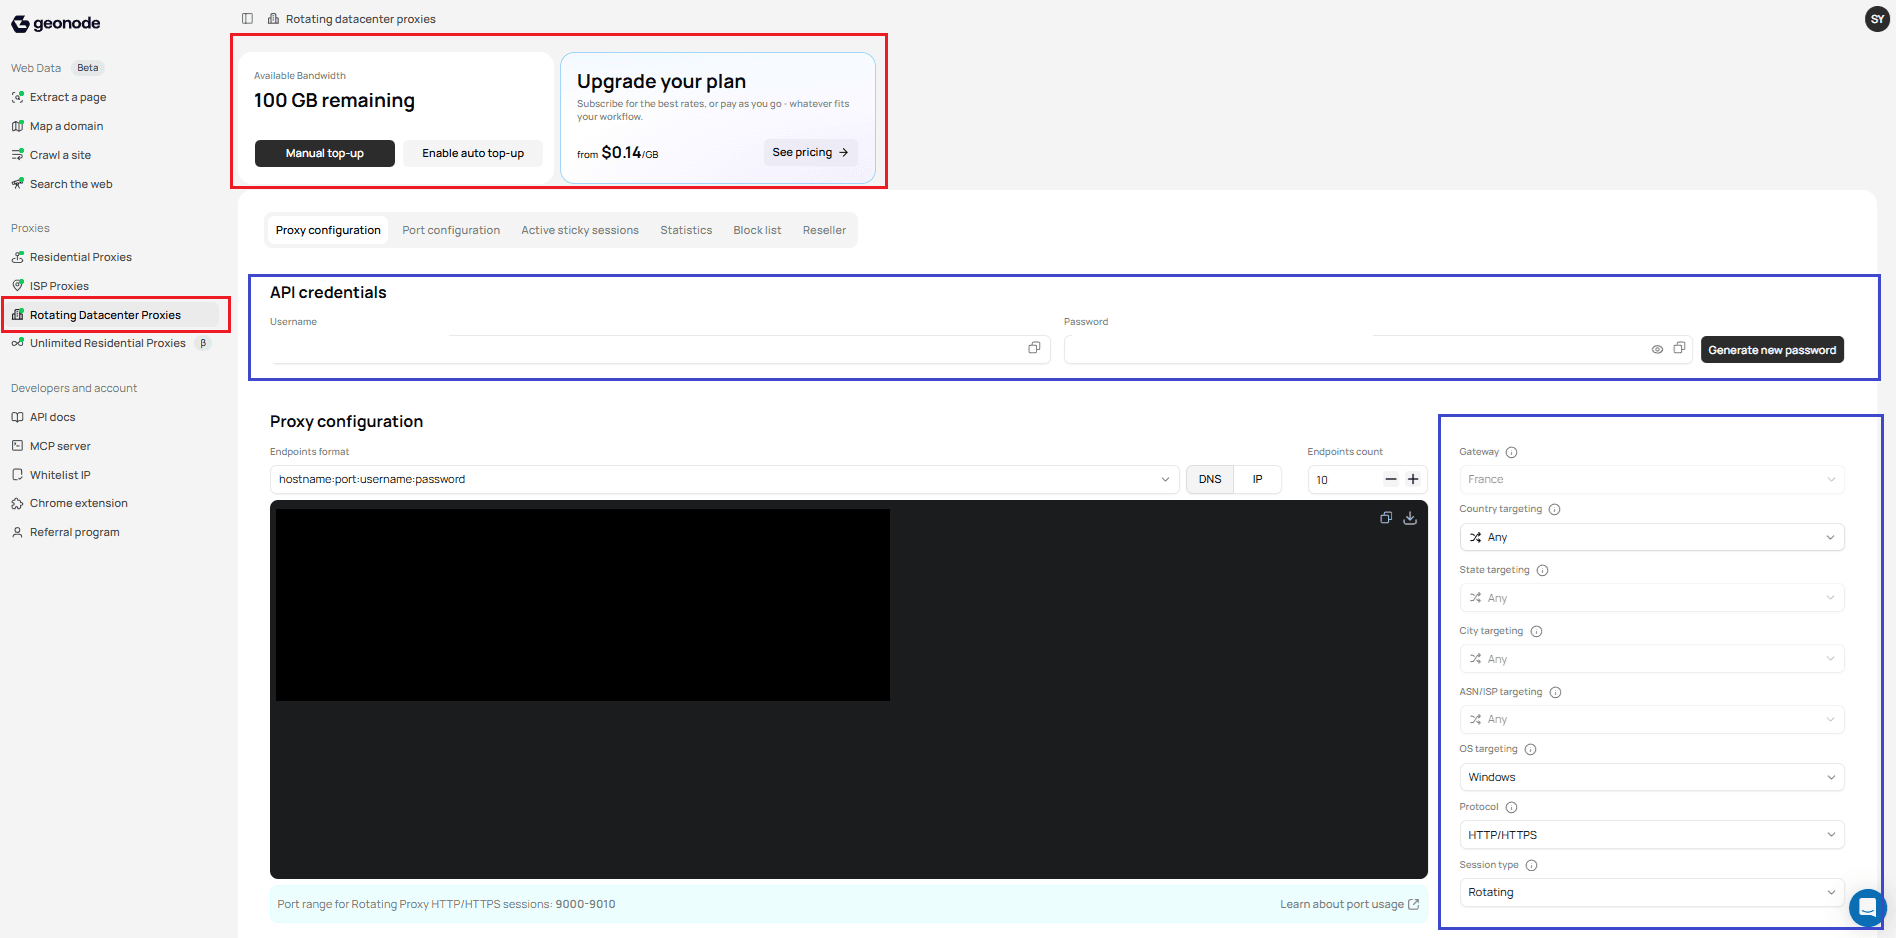
You can configure Rotating Datacenter Proxies from the Geonode dashboard under Proxies → Rotating Datacenter Proxies → Proxy configuration.
From Proxy Configuration, you can set:
- Gateway
- Country, state, and city targeting
- ASN/ISP targeting
- OS targeting
- Protocol
- Session type
- Endpoint count and format
- API credentials for username and password authentication
The dashboard also includes Port configuration, Active sticky sessions, Statistics, Block list, and Reseller.
See Block List to block outlier domains, IPs, or wildcards so the proxy never fetches them.
Configuration Options
| Option | Description |
|---|---|
| Gateway | Select the gateway region for your proxy traffic |
| Country targeting | Any by default, or a specific country |
| State targeting | Any by default, or a specific state or region |
| City targeting | Any by default, or a specific city |
| ASN/ISP targeting | Any by default, or a specific ASN/ISP when available |
| OS targeting | Filter by operating system when available |
| Protocol | HTTP/HTTPS or SOCKS5 |
| Session type | Rotating or Sticky |
| Endpoints | Number of endpoints and output format |
Bandwidth
The top of the Rotating Datacenter Proxies page shows your available bandwidth in GB.
From there you can:
- Check remaining bandwidth
- Use Manual top-up to add traffic
- Enable auto top-up
- Open See pricing to review plan rates
For full Pay As You Go and Subscription pricing, see Pricing.
Endpoint Format
Use this format for tools that accept a single proxy string:
hostname:port:username:passwordExample:
proxy.geonode.io:9000:USERNAME:PASSWORDReplace USERNAME and PASSWORD with your dashboard credentials.
Port Ranges
For rotating sessions, Geonode uses these common port ranges:
| Protocol | Port range |
|---|---|
| HTTP/HTTPS | 9000–9010 |
| SOCKS5 | 11000–11010 |
The dashboard shows the active port range for your selected protocol under the generated endpoint list.
Basic Connection
HTTP
curl -x http://USERNAME:PASSWORD@proxy.geonode.io:9000 https://ipinfo.ioSOCKS5
curl --proxy socks5://USERNAME:PASSWORD@proxy.geonode.io:11000 https://ipinfo.ioTargeting
Rotating Datacenter Proxies support the same style of geo and network targeting as Residential Proxies:
- Country targeting — route traffic through a specific country
- State targeting — narrow traffic to a state or region
- City targeting — target a specific city
- ASN/ISP targeting — route through a specific ISP or ASN when available
- OS targeting — filter by operating system when available
For detailed targeting workflows, see:
Sessions
Rotating Datacenter Proxies support both rotating and sticky sessions:
- Rotating — a new IP is used across requests, typically over rotating ports such as HTTP
9000–9010 - Sticky — keep the same IP for a session when you need continuity
For session workflows, see:
- Rotating Proxies
- New Sticky Session
- How to Release Sticky Sessions
- How to Set Proxy Session Lifetime
Endpoints and Credentials
From Proxy configuration, you can:
- Copy your API username and password.
- Choose an endpoint format such as
hostname:port:username:password. - Generate one or more proxy endpoints.
- Use the generated endpoints in your tools or scripts.
For code samples generated from your configuration, see API Code Generator.
Monitoring
Use the dashboard Statistics view and usage guides to monitor traffic and performance.
See Usage Stats & Analytics for monitoring proxy usage.
See Latency Testing when you need to test response performance.
Getting Started
To start using Rotating Datacenter Proxies:
- Open the Geonode dashboard.
- Go to Rotating Datacenter Proxies.
- Open Proxy configuration.
- Set your targeting, protocol, and session type.
- Copy your credentials and generated endpoints.
If you are new to Geonode proxies, start with the Quick Start Guide.
Was this page helpful?