This guide will help you configure a Geonode Proxy on your iPhone using Wi-Fi connections.
Prerequisites: Get Proxy Credentials from Geonode
Before setting up a proxy, first, retrieve your proxy credentials from the Geonode dashboard.- Follow this guide: How to Obtain Proxy Server Information
Steps: Setting Up a Proxy in iOS
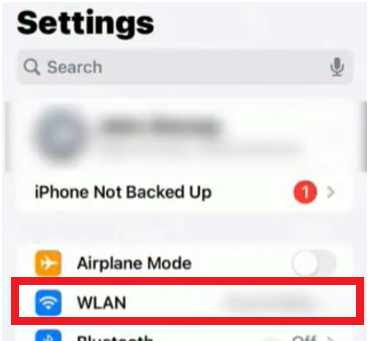
Follow these steps to configure a proxy in iOS:Step 1: Open iPhone Settings
- Open the Settings app on your iPhone.
-
Tap on Wi-Fi to view available networks.
Step 2: Access Wi-Fi Network Settings
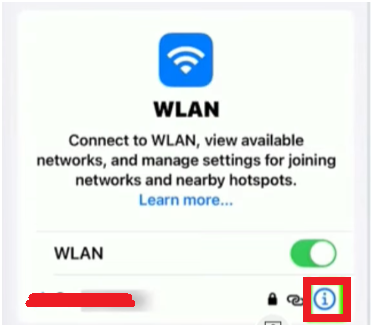
- Connect to the Wi-Fi network you want to configure a proxy for.
-
Tap the “i” icon next to the connected network.
Step 3: Navigate to Proxy Settings
-
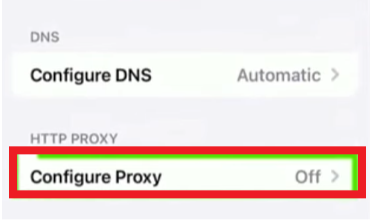
Scroll down to the “HTTP Proxy” section.\
-
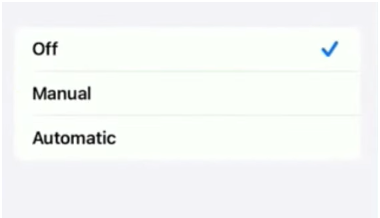
You will see three options:
- Off (No proxy configured)
- Manual (Enter proxy details manually)
- Automatic (Uses a PAC file for configuration)
Step 4: Enter Proxy Details
-
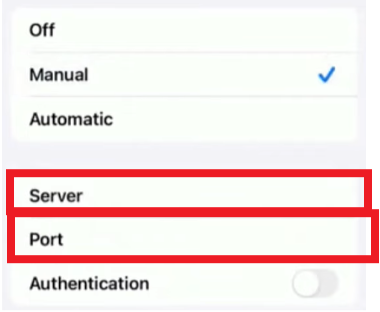
Under Manual Proxy Configuration, enter:
- Server (Proxy IP Address)
- Port
-
If authentication is required, toggle Authentication ON and enter your username and password.
- Tap Save to apply changes.
Note: Once the Proxy server is set up, a prompt for example on google chrome or other applications or programs on the system may request to provide proxy authentication which is the proxy username and password. This is required to proceed using the proxies. If you do not wish to provide authentication, you can consider to whitelist your IP. Refer to this guide for How to Whitelist an IP
Verify Proxy Connection
To ensure the proxy is working, check your IP address using an online tool or follow this guide:If you encounter any issues, refer to the troubleshooting section or Geonode support.
FAQs
My proxy connection failed. What should I do?
My proxy connection failed. What should I do?
If your connection fails, check the following:
- Ensure that your proxy credentials (IP, Port, Username, Password) are correct.
- Verify that your proxy is active in the Geonode Dashboard.
- Try another proxy format if the selected one isn’t working.
- Refer to this guide for troubleshooting: Troubleshooting Proxy Connection Issues
Why is my IP address not changing?
Why is my IP address not changing?
- You may be using a Sticky Session proxy that keeps the same IP for a certain duration.
- If using a Rotating Session, verify that your requests are being routed through the proxy correctly.
- Check your connection using an IP verification tool: Verify Proxy Connection
Why am I getting a CAPTCHA while browsing?
Why am I getting a CAPTCHA while browsing?
- Some websites detect frequent IP changes and show CAPTCHAs as a security measure.
- Use Sticky Sessions if you need a stable connection.
- Try switching to a mobile or residential proxy for lower detection rates.
My proxy is working, but the internet is slow. What should I do?
My proxy is working, but the internet is slow. What should I do?
- High latency can occur if the proxy server is far from your location.
- Try using a different proxy region to improve speed.
- Reduce the number of simultaneous requests to avoid overloading the proxy.
Why am I getting the authentication prompt repeatedly?
Why am I getting the authentication prompt repeatedly?
- This can happen if the proxy authentication credentials are not correctly stored or passed by your browser or application. Ensure that the correct username and password are saved in your proxy settings.
- Or you can whitelist your IP. Refer to this guide for How to Whitelist an IP